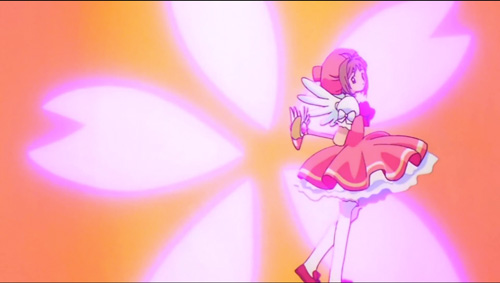
Cardcaptor Sakura is one of my favorite characters ever, so its about time I cosplayed her. It took me awhile to pick out which one of her many awesome outfits to do, but I ended up choosing the pink dress version. A lot of people cosplay this version so I was originally not wanting to do it… but dat skirt! I wanted to see if I could recreate the literal horizontal shape of her crazy poofy skirt! I wore this one to Seishun Con 2013 in June.
White Under Dress
I used a Dorothy costume pattern for the top of this dress. I used white cotton stretch sateen. I modified the neckline and sleeve ends, though, and cut it short. I gave it a slim waist, attached a circle skirt, and added a long invisible zipper. I also serged all of the seams. This layer goes under the main pink dress and over the tutu/petticoat.
Edging
 I originally was going to buy pre-made edging for the whole thing, but as I studied the source, I noticed there were no visible lines. Since all of my supposed-to-be-simple projects end up way super complicated, I decided to do the edging myself. I extended the neckline and sleeve ends of the under dress. Then I added stabilizer and used a scallop stitch on my machine along the edges. I had to be super careful and go very slowly to watch the stitches so I could rotate the fabric and make the curves (about 5 scallops each.) This took quite awhile. Then I removed the stabilizer and very carefully cut off the excess fabric. To create the gathering effect without a seam, I put elastic on the inside and used as invisible of a stitch I could. I think it looks pretty good! ^_^
For the skirt edging I did the same thing, but it took way longer. I think the one circle skirt is like 3 yards? Anyway, cutting the excess fabric off definitely was a chore. There were many movies and tv shows watched while doing all of this edging. :-P
Tutu/Petticoat
I really wanted Sakura’s petticoat to be as horizontal as possible, so I basically created a very frilly pancake tutu. I followed directions to make a legit one as possible. There are 10 layers, each shorter than the other, each 4 to 3 lengths of tulle combined. So like ~250 inches per layer. Sewing it was a super big pain. I had to create a strip of tulle and sew them on individually in a weird stacking manner. This resulted in a ball of poof. I actually used too little layers the first time and ended up needing to buy stronger tulle and add that in. It was super difficult.
I tamed the layers a bit and added the hoop casing. I ordered legit tutu hooping from corsetmaking.com and stuck that in. I tacked the ends of the tutu into 2 layers (also leaving 2 layers free underneath). Then I took my cotton sateen and made yards and yards of my custom edging and sewed that on. I didn’t like the way the gathering looked so I added white bias tape to it to clean it up. At this point my hands could take no more abuse, so I bought a ton of pre-made edging and added those to the under layers of the tutu. The idea is that you don’t really see those anyway so it doesn’t matter so much that it doesn’t match. :-P If you’d like a better explanation than what I gave, check out this site on legit tutus, and this one on hooping.
I drafted a topper (basque) for the tutu and hand sewed that in. Its just made out of leftover kona cotton I had. It has a zipper instead of elastic so its strong enough to keep the heavy tutu up. Then I hand tacked all of the layers together.
Pink Dress
 Getting the color right for this dress was super important to me for some reason. Its not just “pink.” The manga and season 1 intro showed it as a salmony coral pink. The official artwork I saw had a more rosy darker pink, but I like coral better. I dyed 4 1/2 layers of cotton sateen and it turned out beautifully! (after like, 4 tries :-P)
I made a mock dress out of crappy fabric, then made the real thing. I was careful to mimic the source by only having seams on the sides. I added an invisible zipper and attached the top to the skirt. The top is fully self-lined down to the waist.
The skirt consists of 3 whole circle skirts. To help create the extreme ruffly look, I added 2 inch horsehair braid to the edge, rolled under so I could hide the underside. This was a little tedious because the outer circumference of a circle skirt is wider than the inner, so I had to carefully gather the edge to make it stay flat. I added the yellow stripe about 2 inches from the edge with bias tape. I didn’t like the way the hem looked underneath so I also added the same yellow bias tape underneath. So for both top and bottom, half was machine stitched, half hand stitched. Hand stitching bias tape onto 3 circle skirts takes a long time! After all that, the ruffles wouldn’t stay ruffly by themselves, so I had to hand tack them together to keep them up. I think if I ever do this method again, I’ll add wire to force the ruffles up, and also use thicker horsehair braid.
Accessories
I made quite a few bows for this outfit. One huge bow with padding to make it super fluffy looking, and a bunch of smaller bows. Instead of using a rectangle, I tapered the ends in a bit, which I think makes it more bow-like. The bow end/trail things are sewed onto the center loop, and the main bow part slides in. I really like this technique I came up with! I hand sewed them all on, making sure to catch both pieces so the main bows don’t slide out of their little loops.
I struggled with the shoes a bit because I couldn’t find the perfect ones. I was trying to find apple red patent leather mary janes with low or no heels, but I had no luck. So I just used my red shoes I wore with my Katy Perry dress. For the bows, I made straps that slide over my feet with the bows attached, so I didn’t have to actually attach them to the shoes. They slid around a lot so next time I’ll have to add velcro or something.
 The hat was something I just made up. I made a mock using 8 petal shapes. I stabilized the final fabric with thick iron-on interfacing and self-lined the edges. It stays on with little hair combs sewn in. For the bow I used the coral polyester sateen I’d ordered a swatch of, but decided was too shiny and thin for the dress. I think the contrast looks great on the hat though!
The stockings and gloves I made out of a slightly shiny moleskin I happened to have that match the cotton sateen very well. The stockings I made up by wrapping the moleskin on my legs and pinning, then serging. The gloves are a bit different than the kind I normally make, there are no forchettes. Instead there is only one seam on the side of each finger (which was what it looks like in the source), so basically a trace of my hand. They turned out pretty well, even though I really suck at sewing gloves. The seams are so tiny! >.< I hand sewed elastic into the edges of the gloves and stockings and created the same scalloped edging as on the rest of the outfit.
The bloomers were basically just giant panties I made up and added elastic to. They also have the scalloped edging because I'm crazy. :P
I made some quick wings made of out white feather doll wings with extra large white feathers glued on. I ended up not wearing them to the convention because the metal clips were showing, and I want to improve them later.
Everything Else
The wig is a Magnum in Sandy Brown from Arda Wigs. I styled it and ventilated in a hair sample in the same color to get the long pieces hanging down from the sides. I put in the pigtails even though I didn’t need to since they are under the hat. So cute!
Contacts are green circle lenses from Pinky Paradise. I don’t remember which ones. :(
The clow wand and Kero-chan plushie were borrowed from a friend! ^-^
In total this project took me about 150 hours. It was supposed to be a one week quicky comfy hallway cosplay. Whoops. *-*;
Check out the gallery with final pics here!


Hello just wondering how did you got the scallop stitch to turn. I can’t seem to get it right :/
You actually make it seem so easy along with your presentation but I find this topic to be actually one thing
which I believe I would never understand. It kind of feels too complex and extremely large
for me. I am having a look ahead to your next put up, I’ll attempt to get
the hang of it!