Finishing the embroidery on this was such an amazing and relieving feeling. *_* Now I could finally start putting it together and seeing progress! I carefully sewed the embroidered pieces together, making sure to check how the seams were done in the source. Some had satin stitching along the seam to hide it (shoulders, sleeves, etc) and the sides actually had gold satin covering them. I added thicker interfacing for the collar pieces.
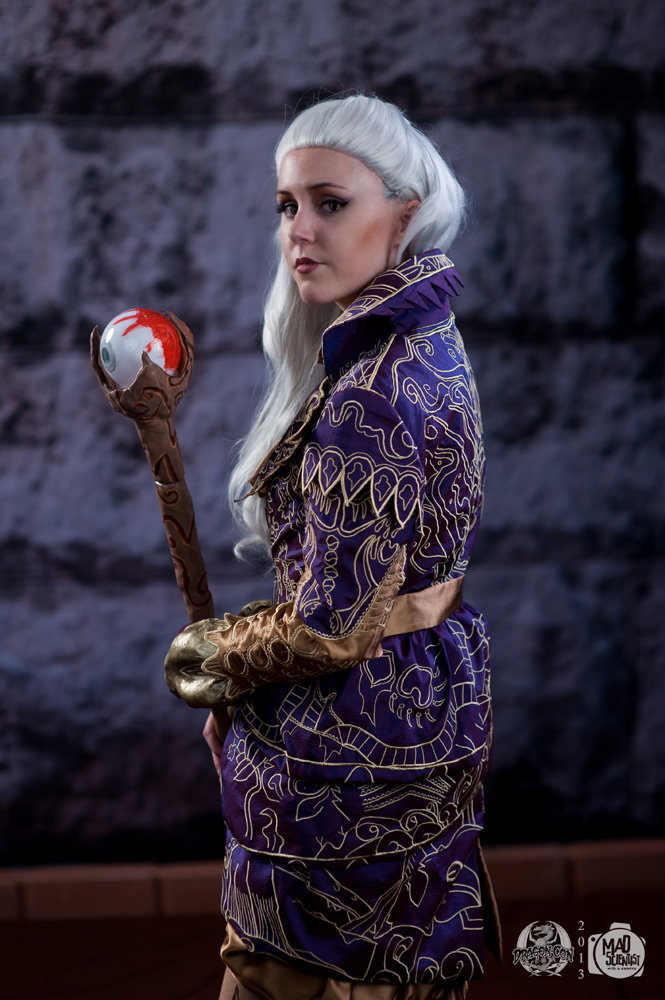
I chose baroque gold Casa satin as my gold secondary fabric. I really REALLY hate satin, but in the end I felt this was the right choice. Story time! Back in high school when I discovered how to manipulate HTML and CSS, I used to make terrible websites. I would go to background swatch sites and use those everywhere. I remember that the satin swatches had the same odd ripple to them as Sheogorath’s gold parts. So yeah, that’s how I made the connection. :P Turns out satin was a bad idea because it already started snagging during Dragon Con. Oh well. x_x
The inside was fully lined with a gold jacquard fabric I found at Joann’s. When I saw it I immediately felt that it was just crazy enough that Sheogorath would want it. xD I originally intended it to only line the top of the coat, but it was so pretty that I used it as the inside fabric for the last layer of the coat tail hanging down. I wanted it to show a little. :)
Next to talk about is all the weird stuff attached to the outfit! The sleeves were different from each other, which I thought was fun. I used 3D petals on the right sleeve bc I thought it was prettier than just embroidering arcs straight onto the satin. The connection of the silk to the satin was done by sewing rows of satin stitching next to each other and then one long satin stitch on top and bottom. I used an old darker gold silk fabric I had (probably fake) to make bias tape for this sleeve. I made the second part of the sleeve detachable with an elastic end to stay on my arm above the elbow. The oddly shaped pieces had wonderflex in them to hold the shape.
The left sleeve was easier to make since it was one piece down to the wrist, but I did add batting to the satin part to give it a quilted look. I used a scallop stitch to line the monster’s mouth, so cute. ^.^ (Pretty sure that’s an argonian eating my lower arm, which is a snake of some kind). The fingerless glove inside is made from cotton jersey and dyed purple. It actually attaches to the snake head piece rather than the sleeve.
The snake head attachment for my left arm and the codpiece were made from Worbla. I sculpted the shapes out of floral foam, then heated the Worbla around it. That material is freaking amazing, it forms to almost any shape! (Compared to Wonderflex, which doesn’t do curves well). I primed them with several coats of wood glue and lined them with matching colored felt for comfort and cleanness. I spray painted them gold and did hand painting with acrylics for the detailing and “tarnish” look. The snake head end tightly slides under the sleeve and is secured with a velcro dot. The codpiece has a worbla bar on the back that the belt sash ties onto.
I made my own tights for this! I used a nice white cotton jersey knit with a bit of a sheen to it, then dyed it to match the satin. In my workspace lighting it looks like the tights match the satin exactly. I did notice however at the con that much of the lighting caused the satin to look warmer, thus not matching. Oh well, no big deal. I painted on the swirl designs with a watered down fabric paint. [pic of tight swirls]
The undershirt is a random creation of mine. You can only see a bit peeking out from the source so I had to make it up. I used linen that I dyed gold for comfort. I sort of drafted/draped a shirt, then added a top panel for the satin and an hidden zipper side seam. The bottom and arm holes are finished with a tiny rolled hem. The top opening turned out really nice actually, it has hidden snaps keeping it closed. The collar is satin stitched the same way as the coat.
The leg warmer thing also has satin stitched embroidery and is made from the same purple silk. There is an invisible zipper up the inside. I made the bottom of it poof out a bit to mimic the source. I made custom shoe covers out of faux brown suede and put them on an old pair of Toms. The satin belt is stiffened with interfacing and self-lined, and the necktie is a strip of satin with a tiny rolled hem.
The staff base is actually a plastic pole from a cheapo Halloween scythe (the same one I used for my Saturn silence glaive actually) wrapped with Wonderflex strips to give it body. After smoothing it out as best as I could I wrapped it in Worbla. I then put many many layers of gesso on to prime it. I used gesso instead of wood glue because I think the paint brush lines in the gesso look like wood lines. I only had to sand it a bit. Then lots of spray painting and hand work with acrylics. The eyeball is a plastic globe with a screw on bottom. I painted the inside of it and secured a small flashlight inside the lid (thank you boyfriend for this idea and helping me! :P). There is a small dot of Worbla inside the staff, so when you push the eyeball down it pushes the on button. Super easy lighting system!
The wig is a Matilda in silver from Arda wigs. I love this wig soooo much! I wefted in light grey throughout and also tried to ventilate some into the hairline sides. Unfortunately the silver and grey blended too much and its hard to tell in the pictures. I needed to ventilate more hair in to make it more noticeable but I ran out of time. I’m going to try to do that before my official photoshoot (not planned yet) as well as add in more wefts. It used to be more curly but they kind of relaxed as I brushed it over and over. I may add curls back in for the shoot. *shrug*
The eyes are prescription banshees from exoticlenses.com. It was pretty expensive ordering from them. Other much cheaper sites had the same lenses but not prescription. So if you want these and only need planos (lucky!), go to pinkyparadise.com. For makeup I did basic cat eyes and purple/gold eyeshadow, and purple lipstick.
Phew I think that’s everything! This project took me about 300 hours, 170 of that the embroidery. I actually logged my hours because I knew it would take so long and people would ask. I’ve never done anything this complicated, and I probably won’t again for quite awhile (maaaybe for next Dragon Con :P). It was definitely worth it because I got it finished and it looks awesome, and so many people have complimented me on it. The funny thing is that even though its incredibly bombastic and difficult looking, I mostly got ignored by people at Dragon Con unless they ended up waiting next to me for an elevator/line, or were friends that were sewing nuts. I think if you really want people to go nuts over your costume, it has to be immediately recognizable (most Elder Scrolls fans have only played Skyrim) or really big. I’m kinda over that though, I’m used to my most precious costumes getting ignored. xD

Anyway, the rest of the pics are below (above pics were taken by Brian Humphrey at Dragon Con 2013). Go to my first write-up to see the first half!


Dang….this is /amazing/. I’m going to be making a Sheogorath costume too, only this is several years later so I can only imagine how few people are going to remember Shivering Isles Sheo (his costume is so much better than Skyrim Sheo…like incredibly so. It’s like Bethesda just gave up on his costume for Skyrm. Yikes). I was thinking of mixing the two together to get a few more eyes my way. I still want to do the embroidered look (although since I don’t have that skill I was thinking of doing brocade instead), but split in half like Skyrim Sheo. The purple and gold on the Mania side, and black and silver on the Dementia side. Anyway, I was just looking around for sources and ideas and stuff and I saw this and I love it~!