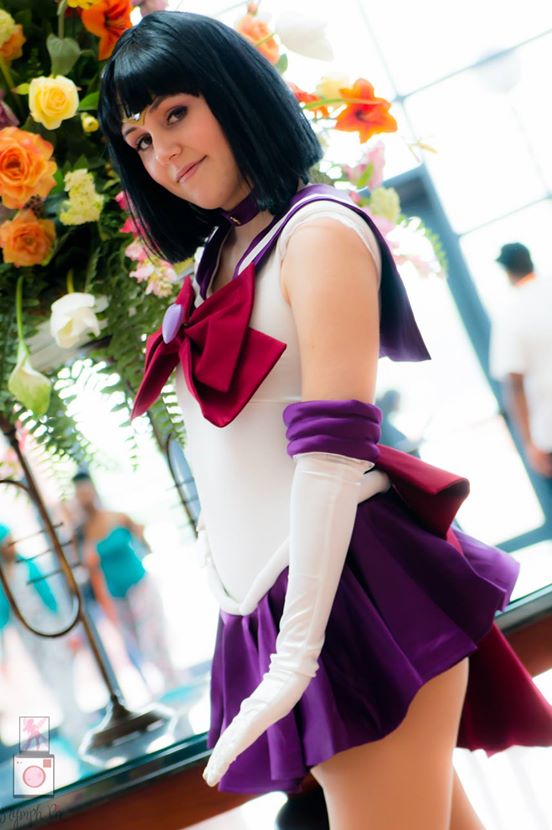
I made a holiday inspired Sailor Saturn for a matching group at Momocon’s Cosplayers on Ice 2014.
Image by Johnny Le Photography

I made a holiday inspired Sailor Saturn for a matching group at Momocon’s Cosplayers on Ice 2014.
Image by Johnny Le Photography
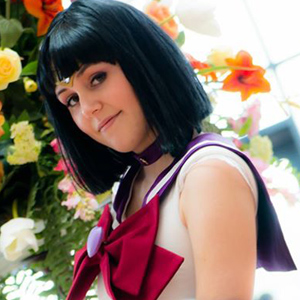
My Super Sailor Saturn that I made as a part of a matching Sailor Moon group in 2014.
Images taken by Nymph Pix at Anime Weekend Atlanta.

At the last minute (3 weeks before) I decided I need another costume for AWA. Saturday I’ll be mostly in my Lydia costume for judging/contest, and the Skyrim commoner dress in between for comfort. That dress will also be what I’ll wear if I go Sunday. So I realized Friday would be a good opportunity for something different. I’ve always wanted to do a Sailor Scout costume since high school, but never found the opportunity. But AWA would be perfect, so I decided to finally do it! I chose Sailor Saturn because in my opinion she has the most interesting/unique outfit. The wig will be easy to find since I can just wear a black medium/short one with bangs. The boots would probably be the most difficult, but I think if I find the right fabric and base shoes I can do it. It’d be great practice for when I do my handmade Skyrim boots in the future. I’m on the fence about the scythe though. I’m not really fond of large anime weapons, and I wouldn’t know where to store it afterwards. This is a work in progress costume, so I’ll be updating this post periodically.
Since I’ve never done a sailor scout before, this will be fun figuring out. Sailor Moon cosplay has been done a bazillion times, yet people still love it! I really want to make it look nice. I’m hoping mine qualifies as a “good” one. :-P It seems like a fairly simple costume overall compared to what I’ve done before, but still needs care to make it well. I’ve got a pretty good idea in my head of how I’ll be going about this, but I’ve researched tips online anyway. This tutorial looks super helpful. I’ll deviate quite a bit, but its a good base. I want to use a nice strong fabric for the leotard. I do ballet, and I like the thick, tight material some of my leotards have since it really slims the body. The bows, skirt, and neck flap thing (forgot the word! >_<) I've really debated about. I need a material that's stiff and will hold its shape, especially for the pleating. The shiny satin stuff doesn't do that and looks kinda cheap, yet I'm not sure how a matte cotton-y material would look, it almost feels "wrong." Saturn's coloring also seems to vary widely, but I think I'll shoot for very deep indigo and burgundy colors.
So as I was looking through that tutorial I linked to, I noticed they put snaps on the crotch of the leotard, with the intention of pulling it over your head. I was thinking, why would you do it that way? Then I realized, this whole thing will actually be difficult to put on. Normally you pull a leotard on by putting your legs through the neck and pulling up, however the neckline will be small and probably won't fit around my hips. The pullover method they mention then seems smarter, however I'm not sure my stiffer non-stretchy version of the skirt will fit over my shoulders. I'll have to test whether it does before I attach it to the leotard. If it doesn't, I may need to do a zipper on the back. If so, hopefully I can master the invisible zipper stitch on my new machine. :-/
Update 9/13/12
 I went to the store yesterday and got the materials for the base outfit (accessories I’ll save for later). I found some nice thick athletic spandex material that should achieve what I’m going for with the leotard (tight and slimming). For the skirt, bows, etc, I ended up getting a really nice quality Kona cotton. It has a high thread count, so its thick enough not to be see-through, holds a pleat very well, and almost has a slight shimmer to it in the light. The color selection wasn’t too great, but I got a decent dark purple and burgundy. They are a bit lighter than I wanted, but it should still be obvious which scout I am. I also got fusible interfacing and some white felt.
So far I’ve done the bows, and they’ve turned out really well! The stiff fabric combined with the interfacing has resulted in really nice sturdy bows.
Update 9/17/12
 I worked on this costume quite a bit over the weekend. I’ve gotten most of the leotard/fuku done, woo! Since I didn’t have a leotard pattern, I had to make something up. I took my measurements and traced a pattern out on some scrap fabric, using the Cupcake fuku tutorial as a visual reference. I then cut out the real fabric, and after pinning and tailoring quite a bit, I finally ended up with a nice fitted fuku. In the anime I noticed the top part (where the boobs go) pokes out a bit and looks padded. It seems what most Cosplayers do is sew in a second layer for the top. I did that, but I also added a layer of felt in between to really make it stand out. As a plus, it provides modesty coverage! (the fabric is fairly see-through.) I did the unique petal parts of the sleeves as well. They didn’t quite turn out as well as I’d hoped, they are bunching a lot and don’t look uniform and pressed. I think its because I didn’t put interfacing in it and didn’t cut the corners enough. I’m debating redoing the sleeves, but the stitch I used was very small and will be a huge pain to take out. :-/
A major mistake I made was messing up the front under the bust where the V is supposed to be. I meant to do it, but I spaced out while cutting and cut it straight across. >.<
Update 9/20
I got the skirt done, yay! I wanted it to look like the anime version, nice and stiff with very visible pleats, and I think it turned out pretty well. I used 2 yards of the purple Kona Cotton for it. I cut off about 14 inches from the height (fabric to use for later) and used the rest for the skirt. I put a layer of the fusible interfacing in between and folded it back at the original fold. In order to not have to hem it, I used the fold as the bottom of the skirt. I pleated the top and pinned the two ends together, made sure the radius of the skirt fit me right, then ironed the pleats. At this point, even with the interfacing keeping it stiff, the bottom of the pleats were fanning out really wide. It was quite silly looking actually. :-P So I fixed that by sewing a line down each pleat on the inside of the skirt to hold them in place. I put it on and put the white tube thingy (that lining at the top of the skirt where it meets the fuku) I had made earlier over it in the right spot and positioned it with pins. Then I cut off the extra fabric poking out the top and sewed the skirt to the liner. Of course I forgot about the bow and had to take out the seam at the back and add it. (My seam ripper is my best friend!)
I also constructed the star broach and necklace. I cut out the shapes from white craft foam and glued them together. Then I coated them with a thick layer of glue and sprinkled on a fine white glitter. Lastly, sealing it with a clear sealer from a can. To attach, before I glued the pieces together I sewed the first layer into the fabric of the bow and necklace.
Update 9/25
UGH I’m so tired of buying costume stuff! I’ve been to craft stores so many times in the past couple of weeks, they probably think I’m the creepy girl now that buys totally random weird stuff. Like yesterday I was getting the stuff for the Silence Glaive (scythe), and at Michaels I bought 2 styrofoam cones and black paint. I wonder what they thought of that. I’ll post a list of everything I bought and how much I spent on it later when I’m completely done. Anyway…
So for progress, I’ve done a lot over the weekend. I mostly worked on the boots, and they were a pain! My fingers are so torn up from pinning. >.< For the base I used really old dance shoes I've had since high school and never wear anymore. For the first attempt, I took scrap cloth and started pinning it to my leg with the shoe on. I thought it looked okay so I used that as a pattern. I cut out the purple cloth and super thick interfacing with the intention of making the boot sturdy. Well, that didn't turn out so well. The interfacing didn't wrap to my foot like the pattern did, so I had to add a lot of ugly darts. After spending a whole day on it, I ended up with a pretty ugly boot. The next day I gathered my scraps and decided if I was careful, I could start over. I found this tutorial, and it helped a lot! I eyeballed their pattern and adapted it to my own foot. For structure, I used leftover thin fusible interfacing for the main foot, and the thick stuff starting at the ankle up. This turned out much better since the foot part was easier to shape. I ended up with some nice looking boots! As of now, I need to line the tops and center (instead of hemming, I think it’ll look nicer) and add grommets.
I also worked on the tiara and scythe a bit. For the tiara I cut the shape from craft foam, added the edging, glued on a fabric backing, and shaped it with heat from the stove. For the scythe, I cut 2 copies of the blade out of white craft foam and glued a fabric backing to one of them. I thought this would make it stiff enough, but it was still a bit floppy. So I cut wire from a hanger and bent it to go along the center of the blade and hot glued the other half on top. The wire made a ridge in the foam, which is good because the blade has that shape anyway, and I’ll be painting 2 shades along that line. I then took a cheap plastic scythe I bought at Party City and cut off the plastic blade. Then I stuck the wire on my blade into the silver plastic end. There was a hole left from cutting off the blade, so I stuffed it with polyfil and lined the opening with hot glue. To make the base of the blade, I cut out petal shapes from leftover craft foam and hot glued them on. (Hot glue is awesome when working with foam btw!) This is as far as I got. I’ve already started sealing the tiara and scythe foam parts with a water and glue mixture to prepare them for painting.
Update 10/2/12
Done! I actually finished it around 5AM before AWA on Friday, but I didn’t have time to update until now. So I painted the scythe and tiara and they turned out okay. I had bought white gloves from Party City because I wanted to save time, but they were really terrible quality and had holes in the seams. I would have just fixed them, but the fabric was this ugly shiny stuff (hard to tell behind the plastic wrapping) so I just returned it. Having to hand make gloves was why I was up so late. :-P I also made the mistake of opening my wig on Wednesday night instead of earlier. The wig was a hot mess, it looked like someone let their dog play with it. Needless to say, I took that back, too. Luckily I got a better wig. Unfortunately it was too long and I had to trim it, but it turned out okay.
Anyway, here are the final pics! Click to view the full size.


At the Con: I will update these as I find good ones floating around online!
–https://www.facebook.com/photo.php?fbid=10152150419190570&set=a.10152150404215570.910595.507895569&type=3&src=https%3A%2F%2Fsphotos-b.xx.fbcdn.net%2Fhphotos-prn1%2F36296_10152150419190570_1216841908_n.jpg&size=720%2C960
– http://www.scottyspot.com/AWA2012/AWA2012022.jpg