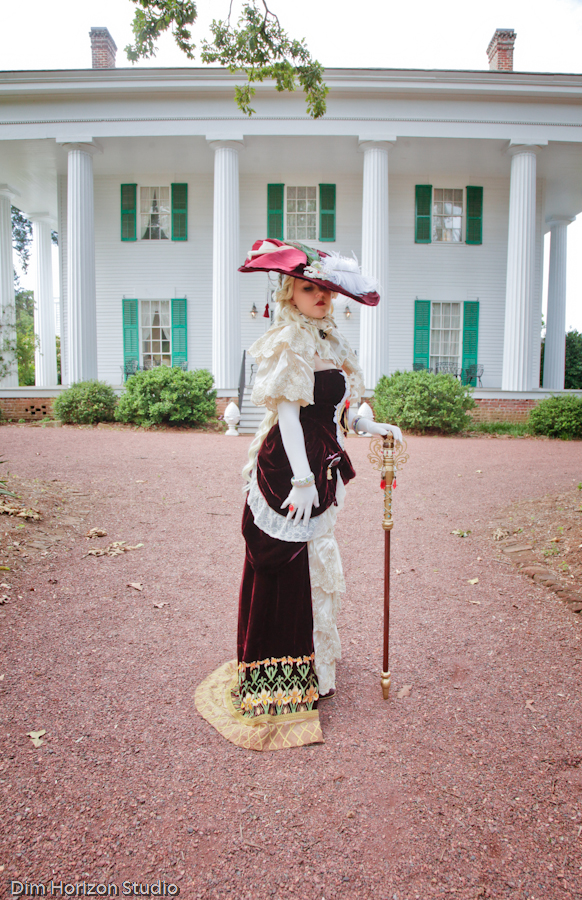
Images taken during Momocon 2017 at Barrington Hall by Dim Horizon Studio.
German Iris by Sakizou: Gallery
Any cosplay that has no specific genre or category
Images taken during Momocon 2017 at Barrington Hall by Dim Horizon Studio.
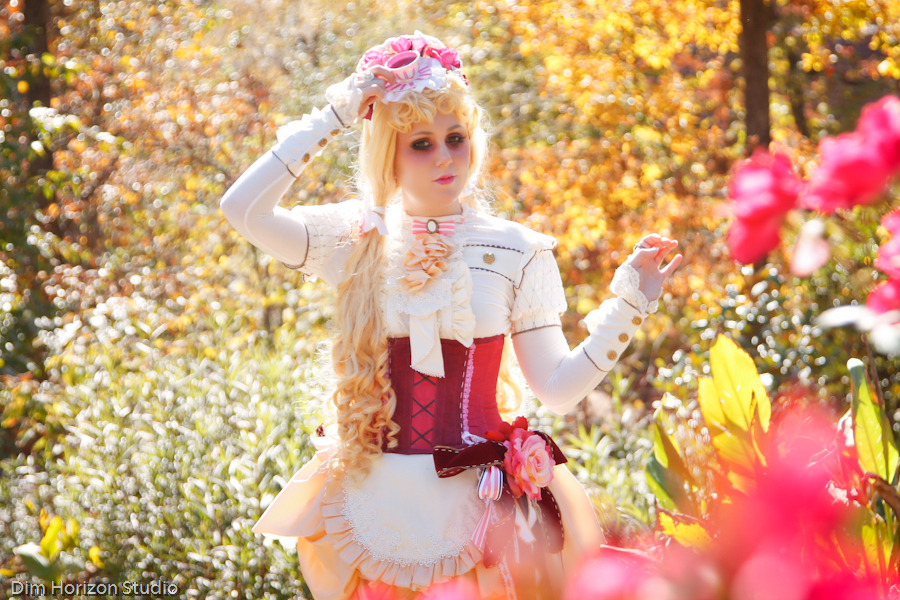
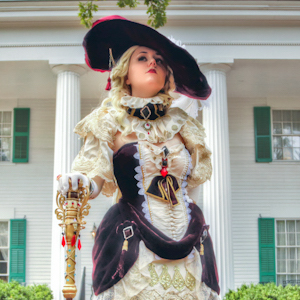
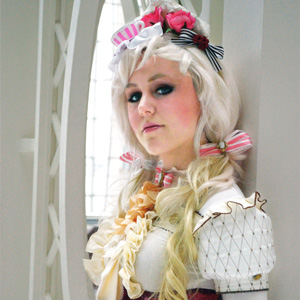
 I made Sakizou’s Garden Pansy for a Sakizou Alice in Wonderland group at Katsucon 2016. The ensemble consists of a corset, weird separated sleeves, hoopskirt, fancy panties, fancy tights, ballet shoes, floral head hear, and a mask (which I didn’t make).
For the corset I used a custom underbust pattern I made for myself awhile back. The outer layers, consisting of dupioni silk, satin, and sateen, are wonderunder-ed to thick twill. The lining layer is dupioni silk. The overall corset construction I did is typical with a busk and grommetted back closure. I added most of the trim to the main part of the corset first, then added the cups (which I frankensteined out of an old bra and shoulder pads), then added the rest of the trim once those were sewn on.
Continue reading “Sakizou Garden Pansy: Progress”
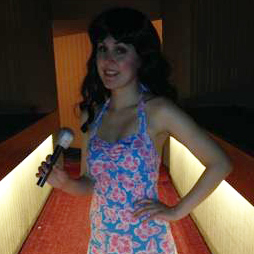
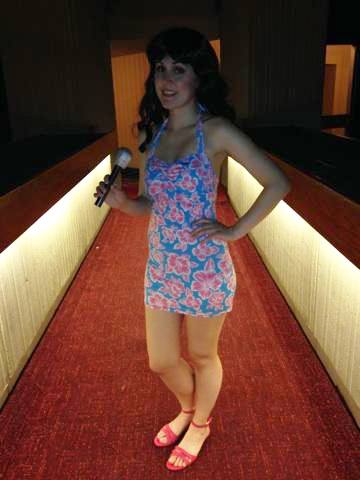
I made a really quick and easy Katy Perry dress for Dragon Con 2014. It took me maybe a day and was meant to be a fun and comfy costume for nighttime shenanigans. :)
I used a Simplicity vintage bathing suit pattern (1374) and modified it into a dress. Its just lycra swim fabric. I don’t have professional images of it and didn’t take much in the way of progress, but here is what I do have!
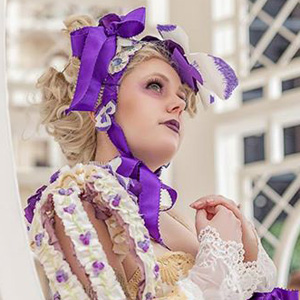
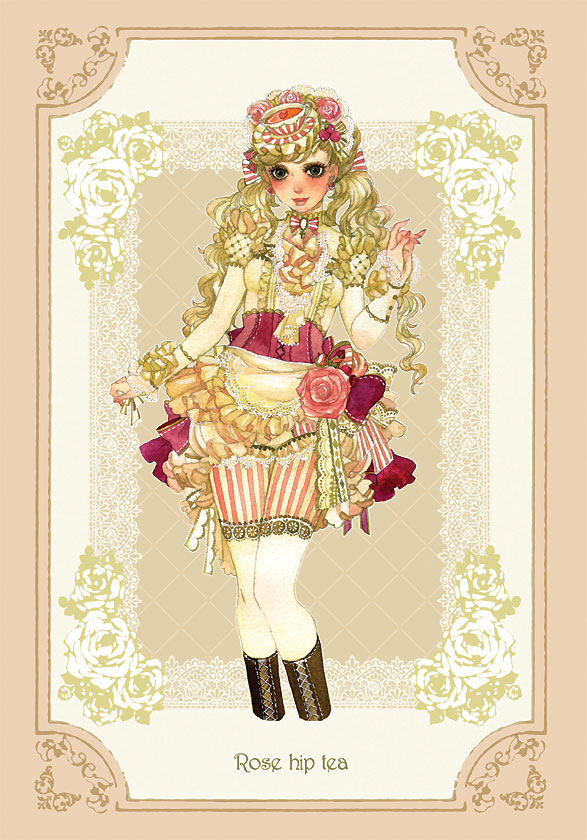 Rose Hip Tea is an original artwork character by the Japanese artist, Sakizo. She does amazing work and created these insanely gorgeous characters, often with a food, beverage, flower, etc. theme. They vary in style a bit, and the one I chose as my first attempt to create in costume has a kind of rococo victorian influence. I’m actually not really sure what the “correct” way to describe it is. :P
So the first thing I started working on / worrying about was the skirt fabric. I had to be that perfect pale peachy pink color and nice looking, however synthetic so I could do the scallops. After much searching and exasperation, I found some (pricey but worth it) polyester taffeta in the perfect color. It looks really nice despite being synthetic, and allowed me to use a soldering iron to cut all of the scallops on the edges. I used a small glass candle holder as a “stencil.” It was VERY stinky and probably bad for my brain cells and lungs (I used a mask but didn’t have a respirator like I should have). I did make sure to not breath it in too much without constantly getting fresh air. Anyway that was probably the coolest thing about this project!
There are 3 gathered layers to the skirt, the bottom being biggest and gathered tightly on the ends to make a bubble-ish shape. On the front of the skirt is simple apron made of ivory cotton sateen and hand-sewed trim with some really nice lace I got from Etsy. The skirt was then sewn onto a waistband with hooks and snaps for closure. To make it really poof up over my butt, I made a basic crescent shaped bum pad out of white broadcloth with tulle strips layered on top.
The main fabric for the shirt is an ivory cotton jersey with a nice sheen to it. The front decorative piece and sleeve ends are ivory cotton sateen and various laces I had around. The rick rack and other brownish trim was originally white, and I colored it with a brown/gold sharpie by hand (was synthetic and I didn’t feel like buying poly dye. This may have been a huge mistake, I’ll find out when I wash it haha.) The rose motif lace around the wrists I also ordered from Etsy. The sleeves I quilted myself out of the ivory cotton sateen and batting. For the ruffles over the sleeves, I “hemmed” it with a tiny sulky brown satin stitch, using stabilizer to help. (Could have used my serger to make it easier I guess, sometimes I don’t know why I do the crazy inefficient things I do). I dotted the diamond corners with brown Swarovski crystals, alternating shades a bit for more interest. The rose buttons I found on clearance and painted gold.
Continue reading “Rose Hip Tea by Sakizou: Progress”
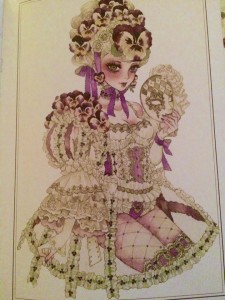
Rose Hip Tea, original artwork by Sakizou.
The first batch of images were taken at Callanwolde Fine Arts Center by Dim Horizon Studio.
In February of 2013 I went to the Hair of the Dragon party and got tons of great pics of my Katy Perry costume! The photographers have been uploading their photos, and some even edited them to look really cool! In this gallery are my favorites. Some are pre-edited, and some were edited by me (and I stuck in the photographer’s name). There were some greenscreen ones I may try to do something cool with. I’ll edit those when spring con season slows down.
 Photo Credit: Kevin Winter Photography
Continue reading “Katy Perry Peppermint Dress: Gallery”
I’ve decided to add a new section to my blog, which is makeup! Before I go any further, I have to add a disclaimer that I am NOT a professional makeup artist, and my future makeup posts are not meant to be “this is how you’re supposed to do makeup” type posts. In fact, they’re not even really tutorials. I just want to document and show people what makeup I did. It would be awesome to give people ideas on what to do for makeup for the same character, and even get feedback on how I can improve the look.
Continue reading “Cosplay Makeup”


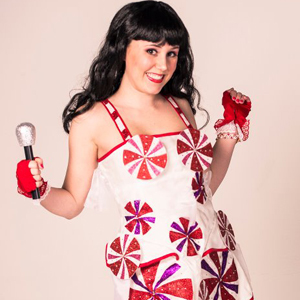
For Halloween 2012, I made Katy Perry’s famous spinning Peppermint dress from her most recent tour. Since I’m super into costuming now, and I always need an excuse to hone my skills, I took advantage of Halloween and decided to go all out! …Even though all I did was go to some bars with friends… too old to Trick or Treat or do anything really fun. :( Anyway, here’s a site with good reference pics, since I don’t want to get in trouble for stealing images. My gallery is at the end of this post!
So I started out by getting materials. For the base of the dress I got a white, slightly shimmery middle-of-the-line satin (not the good stuff, but not the crappy costume stuff). I also got white sheer organza for the candy wrapper accents and “petticoat,” red bias tape, a red zipper, and lots and lots of glitter and stick on rhinestones!
I started with the base dress. I happened to have a basic dress pattern set that I break out every now and then. I just modified it by making it shorter. I used leftover linen as my lining, and of course the satin as the outer fabric. The satin SUUUUUCKED. It snagged very easily, the fibers moved around as I cut it, and of course it frayed a lot. I wonder if its because I didn’t get the good stuff, or if all satin is this way. (I have plans to use bridal satin for my Anju dress next year, so I may be in for a rough ride!) Anyway, below are the progress photos of the base dress. I don’t have a real serger (yet) so I “fake-serged” some of the seams by doing a normal straight stitch, then used a zig zag stitch next to it and trimmed it. I also made a simple “petticoat” out of the organza by layering pieces together that I hemmed with my brand new rolled hem foot (squee!). I attached it at the waist. I then made the weird hip flare things and sewed them on by hand.
Then on to the bias tape. The real dress had nice satin trim, but I couldn’t find satin in the pre-made stuff, and there was no way I was making it on my own for a Halloween dress, so I settled for the matte stuff. So I started by lining the front of each side of the back seam, all the way down. Then I treated it like one piece of fabric and sewed the entire thing shut along the middle of the tape. (This is hard to explain in words, sorry!). Then I turned the dress inside out and sewed the back of the bias tape down on each side (making sure to mark the spot where the bottom of the zipper needed to be according to the darts in the pattern). So what I ended up with was a back seam lined with bias tape. Obviously in order to get in the dress it needed a zipper… all in the plan! I sewed the zipper on the underside of the seam from the top down to where I had marked. Once secured, I just ripped out the seam covering the actual zipper. This was my way of trying to do an invisible zipper, I’m still working on making it actually look nice though, my zipper foot skills are lacking. :-P Then I lined the top and bottom of the dress with more bias tape. To finish off the dress, I made thin straps and lined them with thin bias tape (but did not attach them yet).
On to glittering! Glitter sucks btw, if you didn’t already know that. I will probably never ever do such a glittery monstrosity again. Anyway…
I began by covering the red trim with masking tape to keep it safe, then sprayed the whole dress with a white glittery spray several times. While that was drying outside, I worked on the insane glitter accents. I started by cutting out circle sizes on posterboard using bowls as references, then traced the swirly parts. Out of this I made templates. I traced 6 small and 2 large swirly circles on red scrap fabric, and 5 medium circles on paper. I then began the process of gluing and glittering the red, white, and purple glitter on them (white for paper only). Afterwards I sprayed the f*** out of these with glitter sealant. I cut out the fabric pieces and glued them on the dress in the right spots. And sealed the f*** out of it again. For the paper, I glued them to craft foam circles I had already cut out. (In hindsight, for these foam circles, I should have bought pre-glittered craft paper, would have been soooo much easier.)
I then went over all the peppermints and added tons of bling. Should have used glue, but I was lazy and just dealt with the sticky back rhinestones. This was bad as many fell off throughout the night. But next time I’ll know better. Then I quickly sewed on the wrapper accents with leftover organza. I attached the foam circles with brass pin thingies to let them spin. Then I was lazy/running out of time and safety pinned the straps on (if this was for a con, I would’ve attached them in a more legit way) to finish it off. In the end, the sealant actually did a pretty good job. I did not shed glitter wherever I walked/sat/moved like I thought I would.
For the gloves I bought $5 red costume gloves, cut the fingers off, and hemmed the finger holes by hand. Then I added red and white lace to the edges. This created the overall look of her gloves decently enough. If this was for a con, I’d try making the nice leather gloves version. When I finally decided to get a black wig, I couldn’t find the right one anywhere (even though I saw it several times when I was looking for my Saturn wig.) So I got stuck with a really crappy wig I had to shorten and thin out. Oh well.
There are too many progress images to place in the post, so here is a gallery!


Just sticking some pics of old costumes in this blog post since I don’t want to do write-ups for them. THESE ARE QUITE HORRIFYING SO VIEW AT YOUR OWN RISK!!! xD


(Photo by Dave Nelson)

(Photo By Dave Nelson)


It’s hot chocolate, I swear! :P